SpringBoot使用Swagger2

一、简介

Swagger2是一款可以生成RESTful接口文档的工具。而且书写起来很方便,开发人员只需维护代码,不用额外书写文档。使用起来更方便,而且呈现的方式很棒。还支持在线测试。

二、SpringBoot集成

我这里时使用的最新版本2.9.2 我这里项目是使用Maven构建的。

1
2
3
4
5
6
7
8
9
10
11
12
<!-- start swagger -->
<dependency>
<groupId>io.springfox</groupId>
<artifactId>springfox-swagger2</artifactId>
<version>2.9.2</version>
</dependency>
<dependency>
<groupId>io.springfox</groupId>
<artifactId>springfox-swagger-ui</artifactId>
<version>2.9.2</version>
</dependency>
<!-- end swagger -->

配置文件

1
2
3
4
5
6
7
8
9
10
11
12
13
14
15
16
17
18
19
20
21
22
23
24
25
26
27
28
29
30
31
32
33
34
35
36
37
38
39
40
41
42
43
44
45
46
47
48
49
50
package com.xxx.config;

import org.springframework.beans.factory.annotation.Value;
import org.springframework.context.annotation.Bean;
import org.springframework.context.annotation.Configuration;
import springfox.documentation.builders.ApiInfoBuilder;
import springfox.documentation.builders.PathSelectors;
import springfox.documentation.builders.RequestHandlerSelectors;
import springfox.documentation.service.ApiInfo;
import springfox.documentation.service.Contact;
import springfox.documentation.spi.DocumentationType;
import springfox.documentation.spring.web.plugins.Docket;
import springfox.documentation.swagger2.annotations.EnableSwagger2;

/**
* @Author :yaxuSong
* @Description: 增加swagger的rest API查看
* @Date: 13:20 2018/8/20
* @Modified by:
*/
@EnableSwagger2
@Configuration
public class Swagger2Config {

//是否开启swagger,正式环境一般是需要关闭的,可根据springboot的多环境配置进行设置
@Value(value = "${swagger.enabled}")
Boolean swaggerEnabled;

@Bean
public Docket createRestApi() {
return new Docket(DocumentationType.SWAGGER_2).apiInfo(apiInfo())
// 是否开启
.enable(swaggerEnabled).select()
// 扫描的路径包
.apis(RequestHandlerSelectors.basePackage("com.xxx.controller"))
// 指定路径处理PathSelectors.any()代表所有的路径
.paths(PathSelectors.any()).build().pathMapping("/");
}

private ApiInfo apiInfo() {
return new ApiInfoBuilder()
.title("后端服务接口详情")
.description("yaxuSong")
// 作者信息
.contact(new Contact("yaxuSong", "https://weaf.top", "earth@weaf.top"))
.version("1.0.0")
.build();
}

}

部分项目配置不同可能需要配置访问静态文件的路径

1
2
3
4
5
6
7
8
9
10
11
12
13
14
15
16
17
18
19
20
21
22
23
24
25
26
27
28

/**
* @Author :yaxuSong
* @Description: 允许访问Swagger ui静态页面
* @Date: 13:20 2018/8/20
* @Modified by:
*/

@Configuration
public class WebMvcConfig extends WebMvcConfigurerAdapter {

@Override
public void addResourceHandlers(ResourceHandlerRegistry registry) {
registry.addResourceHandler("/static/**").addResourceLocations("classpath:/static/");

registry.addResourceHandler("swagger-ui.html")
.addResourceLocations("classpath:/META-INF/resources/");

registry.addResourceHandler("/webjars/**")
.addResourceLocations("classpath:/META-INF/resources/webjars/");

}
//跨域支持
@Override
public void addCorsMappings(CorsRegistry registry) {
registry.addMapping("/**");
}
}

设置文档内容

1
2
3
4
5
6
7
8
9
10
11
12
13
14
15
16
17
18
19
20
21
22
23
24
25
26
27
28
29
30
31
32
33
34
35
36
37
38
39
40
41
42
43
44
45
46
47
48
49
50
51
52
53
54
55
56
57
58
59
60
61
62
63
64
65
66
67
68
69
70
71
72
73
74
75
76
77
78
79
80
81
82
83
84
85
86
87
88
89
90
91
92
93
94
95
96
97
package com.xxx.controller;

import com.xxx.annotation.EnableRequestLog;
import com.xxx.common.CommonConverter;
import com.xxx.common.Constants;
import com.xxxx.common.Restful;
import com.xxx.common.Restful.Result;
//...........
import io.swagger.annotations.Api;
import io.swagger.annotations.ApiImplicitParam;
import io.swagger.annotations.ApiImplicitParams;
import io.swagger.annotations.ApiOperation;
import lombok.extern.slf4j.Slf4j;
import org.springframework.beans.factory.annotation.Autowired;
import org.springframework.format.annotation.DateTimeFormat;
import org.springframework.stereotype.Controller;
import org.springframework.util.CollectionUtils;
import org.springframework.web.bind.annotation.RequestMapping;
import org.springframework.web.bind.annotation.RequestMethod;
import org.springframework.web.bind.annotation.RequestParam;
import org.springframework.web.bind.annotation.ResponseBody;
import org.springframework.web.multipart.MultipartFile;

import javax.servlet.http.HttpServletRequest;
import java.util.Date;
import java.util.List;
import java.util.concurrent.TimeUnit;

/**
* @Author :yaxuSong
* @Description:
* @Date: 17:17 2018/5/25
* @Modified by:
*/

@Controller
@RequestMapping("user")
@Api(tags = "用户API")
@Slf4j
public class UserController {

@Autowired
private UserService userService;


/**
* type = 0 为粉丝列表 1 - 为关注者列表 默认0
* @param type
* @return
*/
@EnableRequestLog("查看粉丝,关注列表")
@ResponseBody
@RequestMapping("list")
@ApiOperation(value = "查看粉丝和关注列表",httpMethod = "POST",
notes = "type= 0,是查看粉丝列表,type =1 是查看关注列表,默认值是0")
public Result list(@RequestParam(value = "type",defaultValue = "0",required = false) int type
,int limit,int offset,HttpServletRequest request){
AppUser appUser = getUser(request);
if (appUser == null) {
return Restful.failure(RestfulResultEnum.USER_UNLOGIN);
}
if (type == 0) {
return Restful.success(userService.getFollowList(appUser.getId(),limit,offset));
} else {
List<UserListVO> list = userService.getFocusList(appUser.getId(), limit, offset);
if (CollectionUtils.isEmpty(list)) {
return Restful.success(list);
} else {
for (int i = 0;i<list.size();i++){
list.get(i).setRank(Long.parseLong(rankService.getRank(list.get(i).getId())+""));
}
return Restful.success(list);
}
}
}

@EnableRequestLog("同步微信信息")
@ResponseBody
@ApiOperation(value = "同步微信信息")
@RequestMapping("sync/wechat")
@ApiImplicitParams({
@ApiImplicitParam(name = "id", value = "微信对象", required = true, dataType = "WeChatDTO")
})
public Result syncWechat(WeChatDTO weChatDTO,HttpServletRequest request){
AppUser appUser = getUser(request);
if (appUser == null) {
return Restful.failure(RestfulResultEnum.USER_UNLOGIN);
}
log.info("【用户ID = {},类名 = UserController,方法名 = syncWechat, 参数为 = {}】",appUser.getId(),weChatDTO.toString());
UserInfoVO vo = userService.syncWeChat(weChatDTO,appUser.getId());
if (vo==null) {
return Restful.failure(RestfulResultEnum.USER_SYNC_WECHAT_FAIL);
}
return Restful.success(vo);
}

}

实体对象

1
2
3
4
5
6
7
8
9
10
11
12
13
14
15
16
17
18
19
20
21
22
23
24
25
26
27
28
29
30
31
32
33
34
35
36
37
38
39
40
41
42
43
44
45
46
package com.xxx.entry.dto;

import io.swagger.annotations.ApiModel;
import io.swagger.annotations.ApiModelProperty;
import lombok.Data;

/**
* @Author :yaxuSong
* @Description:
* @Date: 11:32 2018/5/29
* @Modified by:
*/
@Data
@ApiModel
public class WeChatDTO {

@ApiModelProperty(value="手机号码",dataType="String",name="phone",example="15300000000")
private String phone;

@ApiModelProperty(value="名称",dataType="String",name="name",example="愿得一人心")
private String name;

@ApiModelProperty(value="性别",dataType="String",name="gender",example="男")
private String gender;

@ApiModelProperty(value="unionID",dataType="String",name="unionId",example="o17g2621sE-9Ak-Nva2QbHzeF4")
private String unionId;

@ApiModelProperty(value="头像路径",dataType="String",name="avatar",example="https://xxxx.png")
private String avatar;

@ApiModelProperty(value="openID",dataType="String",name="openId",example="othzc0VW0T8yyEk52C3lh2H_lTE0")
private String openId;

@ApiModelProperty(value="省份",dataType="String",name="province",example="北京")
private String province;

@ApiModelProperty(value="国家",dataType="String",name="country",example="中国")
private String country;

@ApiModelProperty(value="验证码",dataType="String",name="code",example="2341")
private String code;

@ApiModelProperty(value="邀请码",dataType="String",name="inviteCode",example="LTEtNTQzMDMtRkUwQzQzNjE3NkE0NEM1MzAzNTBGRjk1NkU2QzQ4MkQ=")
private String inviteCode;
}

三、结果展示

访问路径 http://127.0.0.1:10086/swagger-ui.html#/

设置请求方法的“查看粉丝和关注列表”(设置了请求方法

未设置请求方法的api

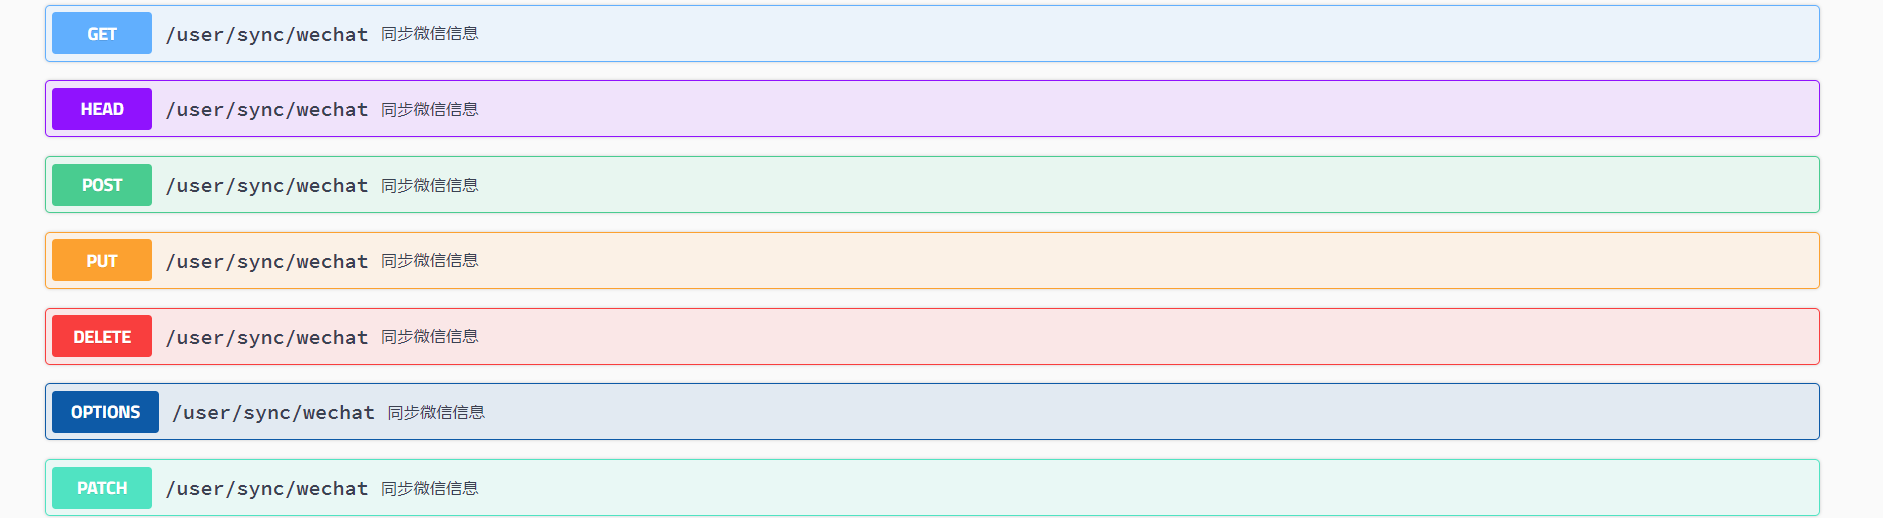
两种设置方法的详细内容(通过点击try it可以进行测试)这里我们也可以通过Postman进行测试
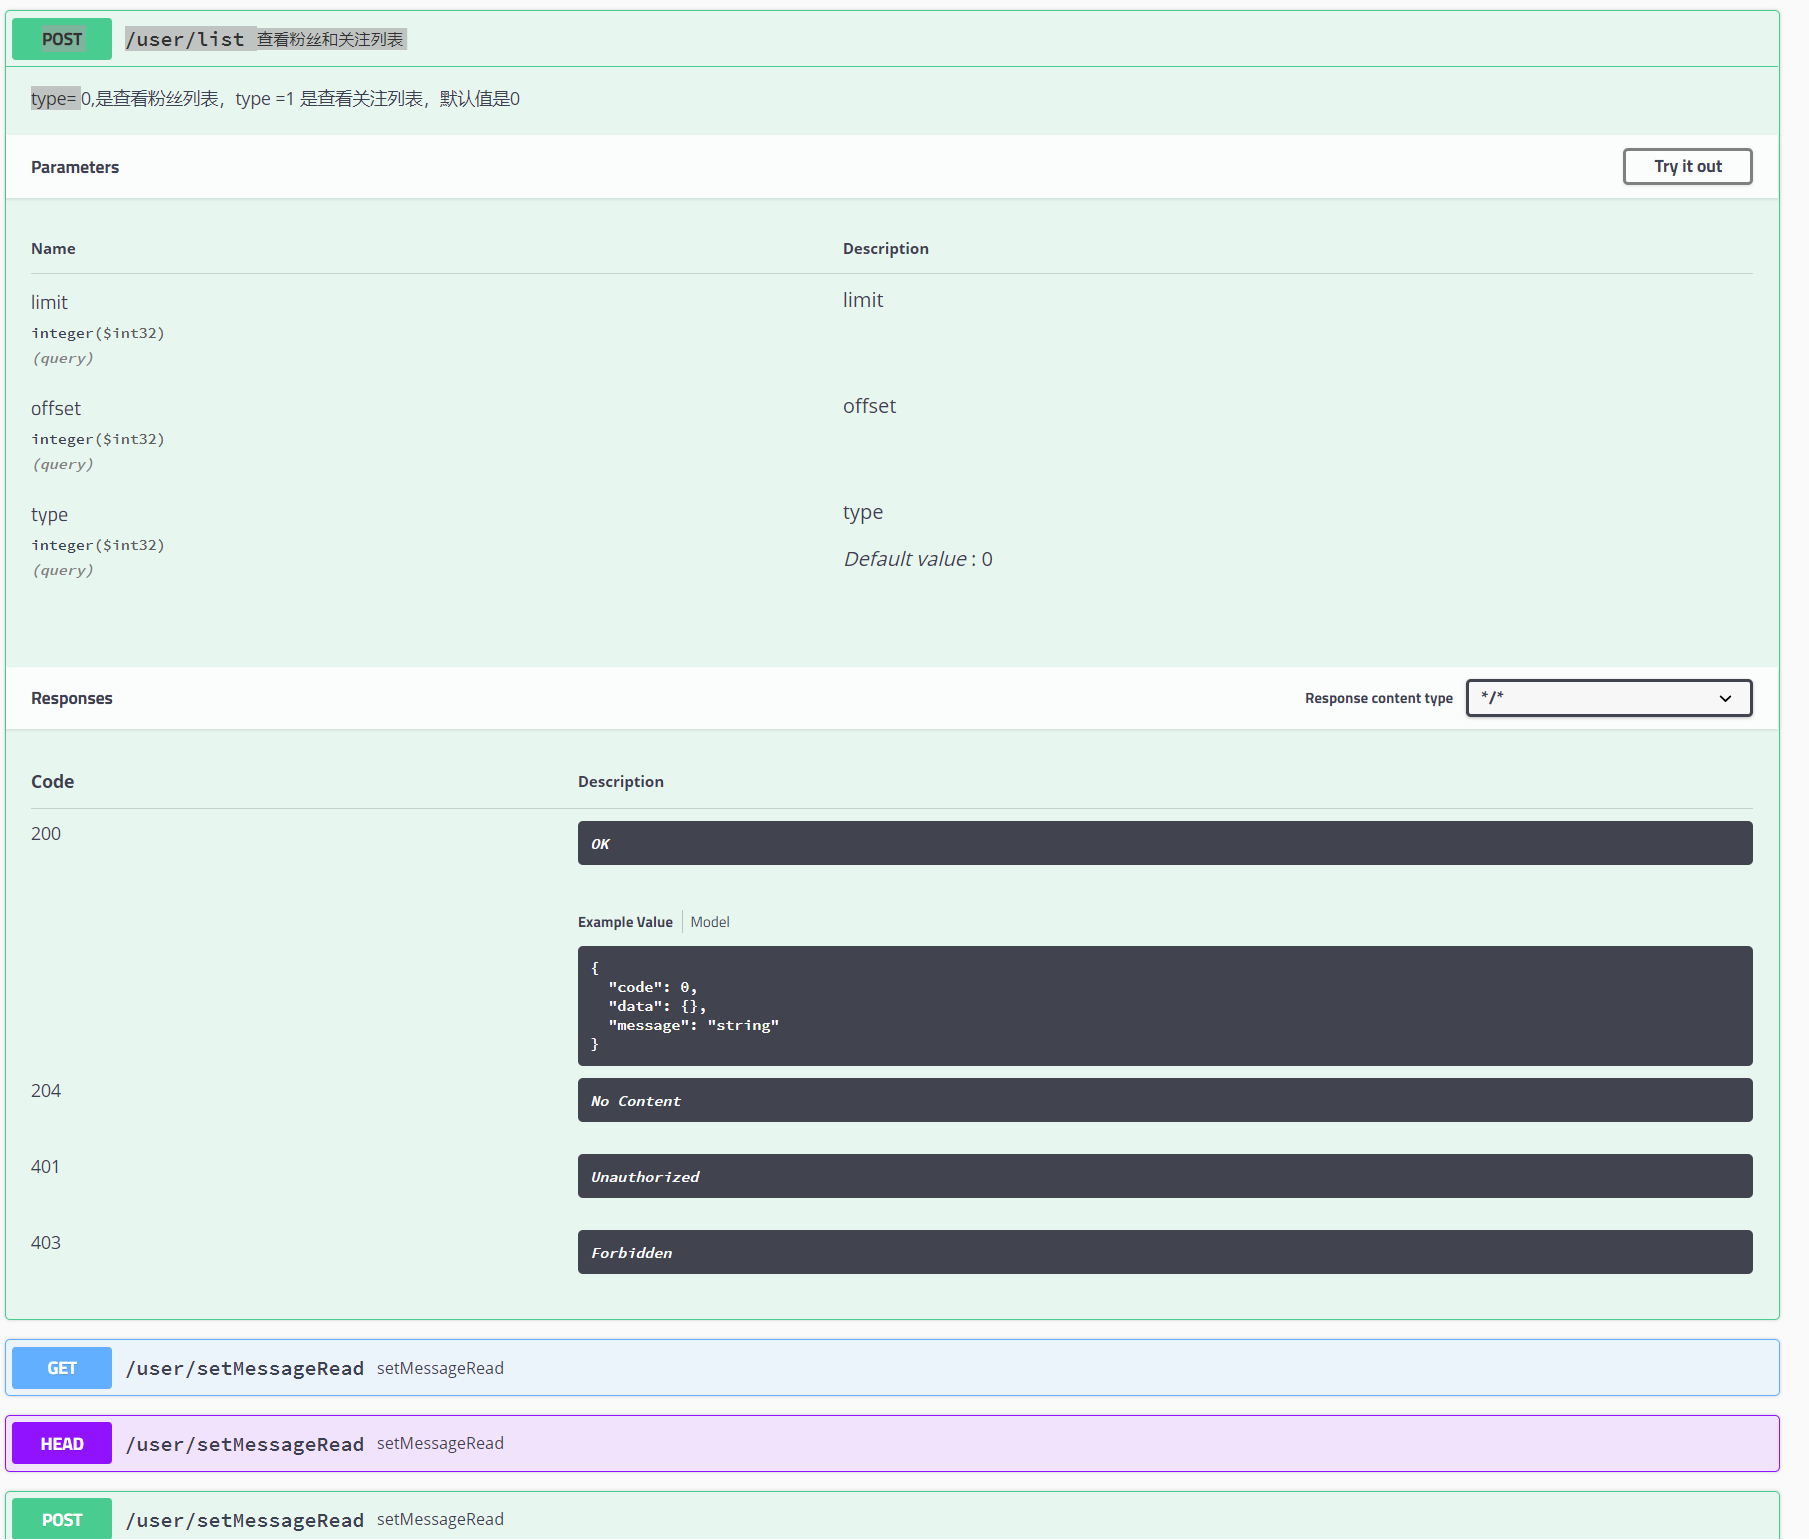
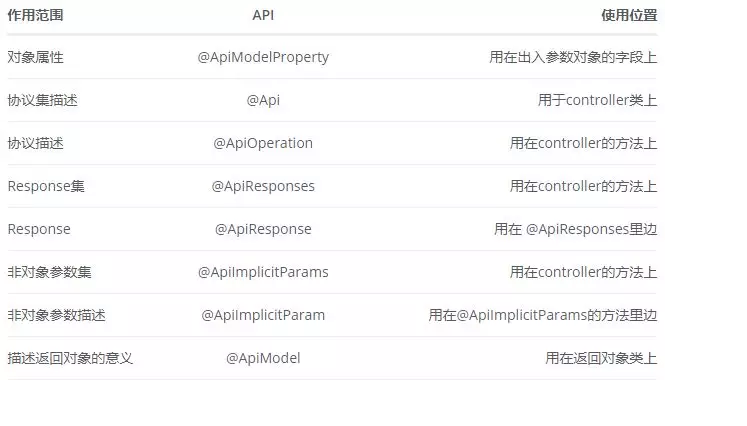
四、相关注解

参考文档:https://swagger.io/