之前我们讲述了简单的搭建,其实微信公众号中的很多用途我们都有可能用到,今天会继续《中篇》,讲述我们最后的几个内容,其他的我也不会在写了,毕竟现在还是有很多资源供我们使用,下边我给大家推荐以下资源(已经封装好的可以直接在spring boot中使用):https://github.com/Wechat-Group/WxJava
一、微信授权(网页)
之前我们都是做一下前期的工作,但是我们如果不进行授权,我们就没有凭证来区别用户,因为我们做的是微信公众号,所以使用微信网页授权,这里提供了以下2种方式的授权:
1、以snsapi_base为scope发起的网页授权
以snsapi_base为scope发起的网页授权,是用来获取进入页面的用户的openid的,并且是静默授权并自动跳转到回调页的。用户感知的就是直接进入了回调页(往往是业务页面),对于以snsapi_base为scope的网页授权,就静默授权的,用户无感知。
2、以snsapi_userinfo为scope发起的网页授权
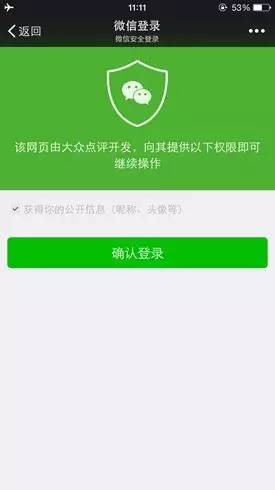
以snsapi_userinfo为scope发起的网页授权,是用来获取用户的基本信息的。但这种授权需要用户手动同意,并且由于用户同意过,所以无须关注,就可在授权后获取该用户的基本信息。对于已关注公众号的用户,如果用户从公众号的会话或者自定义菜单进入本公众号的网页授权页,即使是scope为snsapi_userinfo,也是静默授权,用户无感知。 授权界面:
3、授权步骤
- 引导用户进入授权页面同意授权,获取code
- 通过code换取网页授权access_token(与基础支持中的access_token不同)
- 如果需要,开发者可以刷新网页授权access_token,避免过期
- 通过网页授权access_token和openid获取用户基本信息(支持UnionID机制)
4、授权链接
参考链接 https://open.weixin.qq.com/connect/oauth2/authorize?appid=wx520c15f417810387&redirect_uri=http%3a%2f%2fweaf.top&response_type=code&scope=snsapi_base#wechat_redirect ### 5、具体获取凭证代码
controller 1
2
3
4
5("getOpenId")
public Result getOpenId(String code){
String openId = weChatService.getOpenId(code);
return Result.success(openId);
}
service 1
2
3
4
5
6
7
8
9
10
11
12
13
14
15
16
17
18
19
20public String getOpenId(String code){
String openId = "";
String getUrl = GET_USER_OPENID_AND_TOKEN + "&appid=" + appId + "&secret=" + appSecret + "&code=" + code;
try {
String result = HttpUtil.get(getUrl);
JSONObject jsonObject = JSONObject.parseObject(result);
if (null != jsonObject) {
try {
openId = jsonObject.getString("openid");
} catch (JSONException e) {
log.error("获取token失败 errcode:{} errmsg:{}", jsonObject.getIntValue("errcode"), jsonObject.getString("errmsg"));
}
}
log.info("获取了微信OpenId:{}", openId);
return openId;
} catch (Exception e) {
log.error("请求失败" + e.getMessage());
}
return StringUtils.EMPTY;
}
具体实现的代码,请关注仓库https://github.com/songyaxu/wechat-service
二、使用js-sdk
这里将会涉及一些前端(vue+element)的实现和具体后端的实现也会给出。
1、微信扫一扫
使用的vue,所以我们需找到vue使用的js.
1.安装及使用js-sdk
1 | npm install weixin-js-sdk --save |
导入 1
import wx from 'weixin-js-sdk';
2.使用微信扫一扫
编写_util.js 1
2
3
4
5
6
7
8
9
10
11
12
13
14
15
16
17
18
19
20
21
22
23
24
25
26
27
28
29
30
31
32
33
34
35
36
37
38
39
40
41
42
43
44
45import wx from 'weixin-js-sdk';
function initWxConfig () {
const promise = new Promise((resolve, reject) => {
let url = encodeURIComponent(location.href.split('#')[0])
axios(`http://us-forever.com/api/wx/jssdk?url=${url}`).then(res => {
let data = res.data
wx.config({
debug: false,
appId: data.appId,
timestamp: data.timestamp,
nonceStr: data.nonceStr,
signature: data.signature,
jsApiList: ['scanQRCode']
})
resolve()
}).catch(function (res) {
if (res instanceof Error) {
console.log(res.message)
} else {
console.log(res.data)
}
})
})
return promise
}
function scanQRCode () {
wx.ready(() => {
wx.scanQRCode({
needResult : 1,
scanType : ["qrCode","barCode"],
success : function(res) {
var result = res.resultStr;
alert(result);
return result
//window.location.href = result;
}
});
})
}
export default {
getWxConfig: initWxConfig,
setScanFunction: scanQRCode
}
在实现的界面使用以下方法: 1
2
3
4
5
6
7
8mounted () {
Util.getWxConfig()
},
methods: {
scan() {
const orderNo = Util.setScanFunction()
console.log(orderNo)
},
3.后端实现
1 | ("jssdk") |